Liquid Rubber: The Ideal Solution for Waterproofing
Your Planter Box
Liquid Rubber is an exceptional sealant, expertly crafted to provide unparalleled waterproofing for your planter boxes. Designed with both durability and flexibility in mind, it effectively protects against water damage, root rot, and soil erosion.
Our eco-friendly and easy-to-apply Liquid Rubber ensures that your plants remain healthy and your planter boxes maintain their aesthetic appeal for years to come. Ideal for garden enthusiasts and professional landscapers alike, Liquid Rubber is your trusted partner in creating a thriving garden space.
Why Choose Liquid Rubber for Your Planter Boxes?
Liquid Rubber is not just a waterproofing solution; it's a way to ensure that your garden remains a vibrant, healthy, and beautiful space. With Liquid Rubber, you can focus more on enjoying your gardening and less on the maintenance of your planter boxes.
Long-Lasting Protection: Liquid Rubber creates a durable, waterproof barrier that significantly extends the life of your planter boxes. This protective layer shields the wood, concrete, or metal from moisture, reducing the risk of rot, decay, and rust.
Superior Flexibility: One of the standout features of Liquid Rubber is its ability to flex and move with your planter boxes. This flexibility is crucial in outdoor environments where temperatures fluctuate, ensuring the sealant does not crack or peel over time.
Eco-Friendly and Plant-Safe: Our commitment to the environment and your garden's health is reflected in our product formulation. Liquid Rubber is non-toxic and eco-friendly, making it safe for use around all types of plants, ensuring they grow in a healthy environment.
Versatility for All Planter Types: Whether you’re looking to waterproof new wooden planter boxes or restore old metal or concrete ones, Liquid Rubber adheres strongly to various materials, offering versatile protection for every type of planter box.
Easy Application Process: Liquid Rubber is designed for DIY enthusiasts and professionals alike. Its ease of application means you don't need specialized equipment or skills to achieve a professional-grade waterproofing for your planter boxes.
Cost-Effective Solution: By using Liquid Rubber, you can avoid the costly replacement of planter boxes due to water damage. A single liquid rubber application provides long-term protection, making it a smart investment for gardeners who value quality and longevity.
Enhanced Aesthetics: Beyond just protection, Liquid Rubber enhances the appearance of your planter boxes. It dries to a sleek, clean finish, helping to rejuvenate older planters and maintain the pristine look of new ones.
Transform Your Planter Box in 4 Simple Stages
Liquid Rubber provides an easy and effective way to waterproof planter boxes, ensuring long-lasting durability and protection for your plants. Follow these four simple stages for a watertight planter box.
Stage 1: Power Wash
Thorough Cleaning: Start by washing or water-blasting the entire surface of your planter box. This step is crucial for ensuring the best adhesion of the Liquid Rubber sealant.
Stage 2: Detailing for Precision
Sealant Application: Apply Liquid Rubber Waterproof Sealant with a brush to all seams, joints, and holes.
Geo-Textile Embedding: Embed pre-cut Geo-Textile in the sealant, making sure there are no air pockets or wrinkles.
Additional Protection: Extend the sealant application to any surface rust, pipes, and railing bases. Allow sufficient time for the sealant to cure.
Stage 3: Applying 2-3 Coats of Waterproof Sealant
Layering for Strength: Once the first layer is dry, apply 2-3 coats of Liquid Rubber Sealant using a brush, roller, or LRDIY spray machine.
Drying Time: Allow 24 hours between each coat for optimal results.
Stage 4: Final Protection and Backfilling
Curing is Key: It's crucial to let the Waterproof Sealant cure for 48-72 hours before proceeding.
Protection Board: After curing, apply a protection board (corflute) to safeguard the sealant.
Backfilling: Finally, backfill the planter box with soil, preparing it for planting.
Australian Made Waterproof Membrane for Quality & Safety
Choosing Liquid Rubber means investing in a product that is:
Environmentally Conscious: Our products are VOC-free, contributing to a healthier environment both during and after application.
Proudly Australian: We manufacture our products locally, supporting the Australian economy and adhering to strict quality control measures.
Quality Assured: Our commitment to quality is backed by our ISO 9001 certification, reassuring our customers of the reliability and durability of our products.
Step-By-Step Waterproofing Instructions
Surface Preparation: Begin by thoroughly washing or water-blasting the planter box.
Water Removal: Use a wet n dry vacuum to eliminate remaining water.
Geo-Textile Preparation: Cut Geo-Textile to fit seams, joints, corners, and holes.
Initial Sealant Application: Apply Liquid Rubber Sealant before embedding the Geo-Textile. Ensure a smooth, wrinkle-free application.
First Sealant Coat: Apply an even coat of Liquid Rubber Sealant to the entire surface.
Rapid Cure Option: Use Rapid Cure Spray for a quicker setting, especially useful in unpredictable weather.
Second Coat Application: Apply a second coat of Liquid Rubber Sealant for enhanced waterproofing.
Recommended Thickness: Aim for a 1.5mm dry-film thickness for optimal protection.
Final Steps: Ensure the sealant is fully cured before applying the protection board and backfilling with soil.
Learn more about using Liquid Rubber.
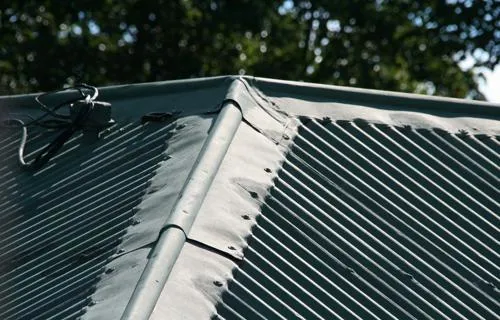
Expert Tips to Detect and Repair Metal Roof Leaks with Liquid Rubber
Metal roofs are prized for their durability, energy efficiency, and sleek appearance. However, like any roofing material, they can develop leaks over time due to wear and environmental factors.
With Liquid Rubber Waterproof Sealant, you can tackle these leaks effectively and protect your property from water damage.

Common Causes of Metal Roof Leaks
Understanding the root causes of leaks is essential for effective repair. Common issues include:
Improper installation
Damaged or missing fasteners
Rusted or weakened seams
Open headwalls or flashing
Missing trims
Loose gutters or downspouts
Gaps in seams and joints
Rust damage and corrosion
By identifying these vulnerabilities, you can take targeted action to resolve leaks and prevent further roof damage.
How to Locate a Leak in Your Metal Roof
Finding the source of the leak is the first critical step. Inspect the following areas:
Roof Surface
Check for holes, rust, and damaged screws.
Look for shifted or misaligned panels.
Connection Points
Examine seams and joints for missing sealant or tape.
Ensure panel overlaps are properly aligned.
Roof Openings
Inspect the seals and trims around vents, pipes, and skylights.
Look for cracks or deterioration in flashing seals.
Roof Edges
Check gutters and flashing for damage.
Inspect for rotting sealants or cap issues.
Fixing Metal Roof Leaks with Liquid Rubber
Liquid Rubber Waterproof Sealant is a versatile and effective solution for repairing metal roof leaks. Here’s how to use it:
Step 1: Prepare the Roof
Tighten or replace any loose fasteners and screws.
Clear away debris, and power wash the roof to remove dirt and rust.
Allow the roof to dry completely before applying any sealant.
Step 2: Reinforce Seams and Joints
Use Liquid Rubber Seam Tape to cover cracks and gaps.
For larger gaps, apply a metal-safe caulking product.
Reinforce areas around vents and flashing with seam tape.
Step 3: Apply Liquid Rubber Waterproof Sealant
Start by sealing reinforced areas with seam tape.
Apply a uniform coat of Liquid Rubber Waterproof Sealant across the roof using a brush, roller, or sprayer.
Allow the first coat to dry completely before adding a second coat for enhanced durability.
Liquid Rubber on Roof Leaks: Pro Tips for Best Results
Patch First: Address holes and significant cracks with seam tape before applying the sealant.
Prime Rusted Areas: Use a water-based rust primer on heavily corroded sections to ensure proper adhesion and long-term results.
Choose Optimal Conditions: Avoid applying the sealant during windy, rainy, or extremely hot weather. Ideal temperatures and calm weather improve application and drying.
Benefits of Liquid Rubber for Metal Roof Repairs
Liquid Rubber products are designed with DIY enthusiasts in mind, offering a cost-effective and environmentally friendly way to repair metal roof leaks.
Non-Toxic: Safe for you, your family, and the environment.
Durable: Creates a long-lasting, waterproof membrane to prevent future leaks.
Cost-Effective: Save money by avoiding expensive professional repairs.
Ease of Use: Simple application with common tools like brushes or rollers.
Protect Your Roof and Save Money with Liquid Rubber
With Liquid Rubber Waterproof Sealant, you can confidently address metal roof leaks, ensuring your property stays dry and secure.
This reliable solution not only saves you time and money but also extends the life of your roof, providing peace of mind for years to come.
Shop for Liquid Rubber products today and discover how easy it is to maintain a leak-free roof!

Expert Tips to Detect and Repair Metal Roof Leaks with Liquid Rubber
Metal roofs are prized for their durability, energy efficiency, and sleek appearance. However, like any roofing material, they can develop leaks over time due to wear and environmental factors.
With Liquid Rubber Waterproof Sealant, you can tackle these leaks effectively and protect your property from water damage.
Common Causes of Metal Roof Leaks
Understanding the root causes of leaks is essential for effective repair. Common issues include:
Improper installation
Damaged or missing fasteners
Rusted or weakened seams
Open headwalls or flashing
Missing trims
Loose gutters or downspouts
Gaps in seams and joints
Rust damage and corrosion
By identifying these vulnerabilities, you can take targeted action to resolve leaks and prevent further roof damage.
How to Locate a Leak in Your Metal Roof
Finding the source of the leak is the first critical step. Inspect the following areas:
Roof Surface
Check for holes, rust, and damaged screws.
Look for shifted or misaligned panels.
Connection Points
Examine seams and joints for missing sealant or tape.
Ensure panel overlaps are properly aligned.
Roof Openings
Inspect the seals and trims around vents, pipes, and skylights.
Look for cracks or deterioration in flashing seals.
Roof Edges
Check gutters and flashing for damage.
Inspect for rotting sealants or cap issues.
Fixing Metal Roof Leaks with Liquid Rubber
Liquid Rubber Waterproof Sealant is a versatile and effective solution for repairing metal roof leaks. Here’s how to use it:
Step 1: Prepare the Roof
Tighten or replace any loose fasteners and screws.
Clear away debris, and power wash the roof to remove dirt and rust.
Allow the roof to dry completely before applying any sealant.
Step 2: Reinforce Seams and Joints
Use Liquid Rubber Seam Tape to cover cracks and gaps.
For larger gaps, apply a metal-safe caulking product.
Reinforce areas around vents and flashing with seam tape.
Step 3: Apply Liquid Rubber Waterproof Sealant
Start by sealing reinforced areas with seam tape.
Apply a uniform coat of Liquid Rubber Waterproof Sealant across the roof using a brush, roller, or sprayer.
Allow the first coat to dry completely before adding a second coat for enhanced durability.
Liquid Rubber on Roof Leaks: Pro Tips for Best Results
Patch First: Address holes and significant cracks with seam tape before applying the sealant.
Prime Rusted Areas: Use a water-based rust primer on heavily corroded sections to ensure proper adhesion and long-term results.
Choose Optimal Conditions: Avoid applying the sealant during windy, rainy, or extremely hot weather. Ideal temperatures and calm weather improve application and drying.
Benefits of Liquid Rubber for Metal Roof Repairs
Liquid Rubber products are designed with DIY enthusiasts in mind, offering a cost-effective and environmentally friendly way to repair metal roof leaks.
Non-Toxic: Safe for you, your family, and the environment.
Durable: Creates a long-lasting, waterproof membrane to prevent future leaks.
Cost-Effective: Save money by avoiding expensive professional repairs.
Ease of Use: Simple application with common tools like brushes or rollers.
Protect Your Roof and Save Money with Liquid Rubber
With Liquid Rubber Waterproof Sealant, you can confidently address metal roof leaks, ensuring your property stays dry and secure.
This reliable solution not only saves you time and money but also extends the life of your roof, providing peace of mind for years to come.
Shop for Liquid Rubber products today and discover how easy it is to maintain a leak-free roof!
Contact Us
17 Vivian Street Blackburn North 3130 Victoria, Australia
Delivery throughout Australia
Pick Up 17 Blackburn Nth Vic 3130