Liquid Rubber Roof and Gutter Sealant: The Ultimate
Defense for Your Home
Comprehensive Protection with Liquid Rubber Sealant
Liquid Rubber Roof Sealant Paint offers unparalleled performance in sealing roof leaks and ensuring long-lasting protection. This high-quality sealant is specifically engineered to tackle the toughest weather conditions, ensuring your roof and gutters remain intact and leak-free.
Outstanding Waterproofing: Expertly designed to prevent leaks and water damage.
Adapts to Temperature Changes: Its flexible nature allows for expansion and contraction, enhancing durability.
Versatile Adhesion: Forms a strong seal on various materials, including concrete, metal, and tiles.
User-Friendly Application: Simplify your repair process with an easy-to-apply formula.
Fast Drying: Minimize downtime with a quick-drying sealant.
UV Resistance: Specially formulated to withstand the harsh Australian sun.
Roof Leak Sealant: Your Trusted Repair Solution
Liquid Rubber is the go-to choice for a broad range of roofing materials. Whether you have a metal roof, concrete parapet wall, or composite panels, this sealant provides a seamless, durable barrier against the elements.
Superior Flexibility: Accommodates natural roof movements.
UV Resistant: Ensures long-lasting performance under the sun.
Liquid Rubber Sealant is an affordable alternative to expensive roof replacements. It's suitable for DIY enthusiasts and professional applicators, easily applied by brush, roller, or spray equipment.
Premium Sealant Tailored for Australian Conditions
Liquid Rubber is proudly Australian-made, ensuring high-quality and reliable sealants for both roof and gutter applications. Our products are:
Safe for Potable Water: Compliant with AS4020 standards.
ISO 9001 Certified: Reflecting a dedication to quality and consistency.
Versatile Applications for Roof and Gutter Waterproofing
Wide Roof Compatibility: Effective on metal, tile, concrete, and more.
Panel Sealing: Ideal for waterproofing composite, fridge, and solar panels.
Residential and Commercial Use: Suitable for all building types.
Adaptable to Irregular Shapes: Perfect for unique roof designs.
Effective Leak Repairs: Quickly seals cracks and gaps.
Roof Sealing/Resealing: Enhances the longevity of new and existing roofs.
Asbestos Safe: Encapsulates asbestos safely.
Skylight and Air Conditioner Sealing: Prevents leaks in critical areas.
Australian Made Waterproof Membrane for Quality & Safety
Choosing Liquid Rubber means investing in a product that is:
Environmentally Conscious: Our products are VOC-free, contributing to a healthier environment both during and after liquid rubber application.
Proudly Australian: We manufacture our products locally, supporting the Australian economy and adhering to strict quality control measures.
Quality Assured: Our commitment to quality is backed by our ISO 9001 certification, reassuring our customers of the reliability and durability of our products.
Step-By-Step Application Instructions
For Roofs
Surface Preparation: Clean the roof thoroughly.
Drying: Ensure complete dryness with a leaf blower.
Defect Identification: Mark areas needing attention.
Seam Tape Use: Apply to joins for added protection.
First Layer of Sealant: Apply Liquid Rubber Sealant with care.
Screw Treatment: Directly seal screws for a watertight finish.
Rapid Cure Spray: Speed up drying if necessary.
Second Layer: Reinforce with another coat of sealant.
Thickness: Maintain a 1.5mm dry-film thickness.
Curing Period: Allow adequate time for complete curing.
Post-Curing Process: Clean the roof and apply additional treatments as needed.
Final Protective Coating: Ensure maximum protection with Thermal Coating.
For Gutters
Gutter Cleaning: Wash and prepare the surface.
Water Removal: Dry the gutter completely.
Geo-Textile Preparation: Cut and place appropriately.
Initial Sealant Application: Apply Liquid Rubber Sealant precisely.
Rust and Joint Treatment: Ensure all areas are covered.
First Coat Application: Cover the gutter uniformly with sealant.
Rapid Drying Option: Use Rapid Cure Spray if required.
Additional Coating: Apply a second layer for robust protection.
Grit Broadcasting: Add for extra grip on the final coat.
Curing Time: Allow the sealant to cure thoroughly.
Final Steps: Clean and finish with Tough Coat + Hardener mixture.
Learn more about using Liquid Rubber.
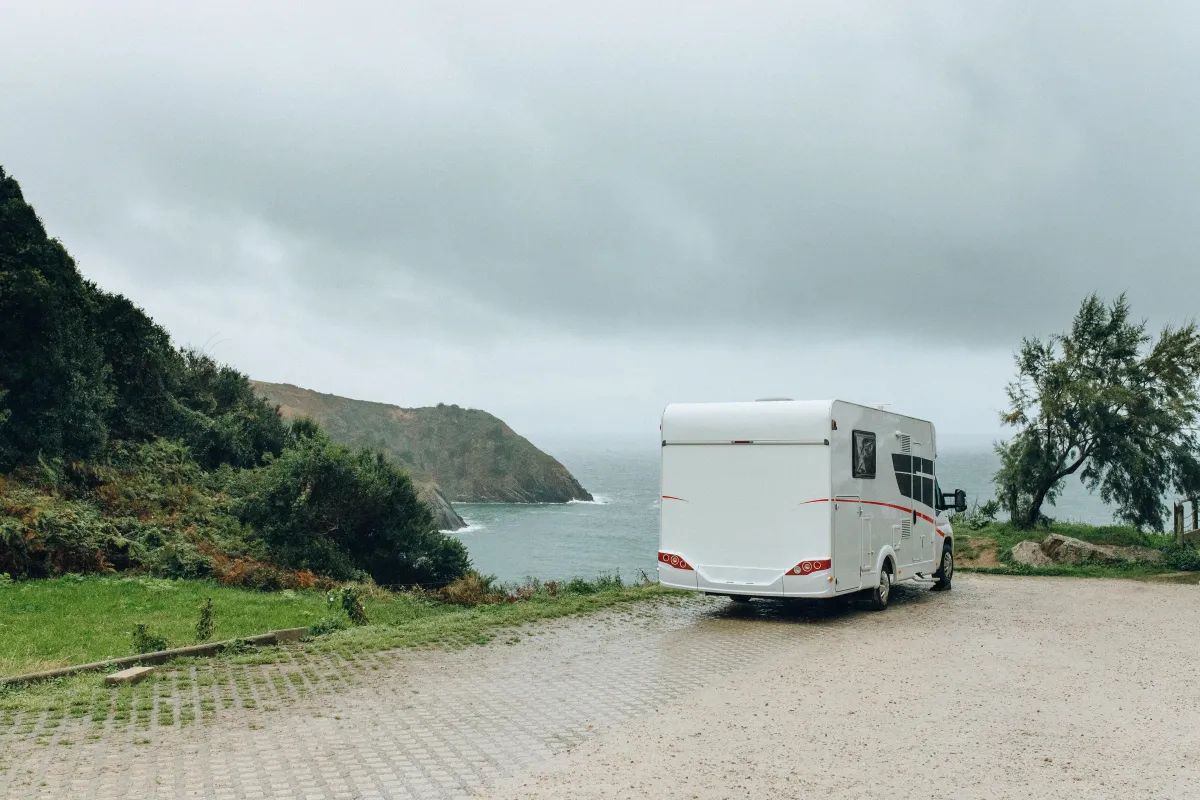
Easy Steps to Fix a Leaking Caravan Roof with Liquid Rubber Sealant
Exploring Australia's stunning landscapes in a caravan is a dream for many. However, a leaking caravan roof can quickly turn your cozy mobile home into a damp and uncomfortable space.
Don’t worry! With the right tools and techniques, you can restore your caravan to its leak-free condition. Here’s a detailed guide on how to repair a leaking caravan roof using liquid rubber sealant, an excellent solution for Australia’s diverse climate.

Locate the Leak in Your Caravan Roof
The first step in any repair is pinpointing the source of the problem. Roof leaks often occur at weak spots like joins, seams, or punctures.
Look for visible signs of water damage or perform a water test by gently spraying the roof and observing where water seeps through. This step requires some patience but is crucial for a successful repair.
Choose the Right Sealing Solution for Caravan Roof: Liquid Rubber
Once you’ve found the leak, it’s time to decide on the best sealing method:
For Small Leaks: A quick fix with silicone can temporarily seal tiny punctures or minor cracks.
For Permanent Repairs: Liquid rubber sealant is ideal for larger leaks or areas with more significant wear. This waterproof, flexible solution creates a durable membrane, protecting your caravan against Australia’s harsh weather conditions.
Apply Liquid Rubber Sealant
Follow these steps to apply liquid rubber sealant effectively:
Prepare the Surface: Clean and dry the roof thoroughly. Remove any debris, dirt, or old, flaky sealant to ensure proper adhesion.
Use a Primer: Apply a primer designed for use with liquid rubber to enhance its waterproof properties and ensure long-lasting results.
Seal and Reinforce: Carefully apply the liquid rubber sealant over the leak and surrounding area. For added durability, especially around joins and seams, use a polyester fabric or compatible tape for reinforcement.
Inspect Caravan Roof for Additional Damage
Roof leaks can cause more than a wet interior—they can lead to long-term structural issues. After sealing the leak, check your caravan for:
Mould and Mildew: Thoroughly clean any mould or mildew with an appropriate removal product. Improve ventilation to prevent future growth.
Structural Damage: Inspect for wood rot, damaged insulation, or compromised interior panels. Repair or replace these components as needed.
Test Your Repair and Maintain Your Caravan Roof
After the sealant has cured, it’s time to ensure your repair is effective:
Conduct a water test by spraying the roof and inspecting for any remaining leaks.
Regularly check your caravan roof for wear and tear to prevent future issues.
Why Liquid Rubber Sealant is Perfect for Australian Caravans?
Liquid rubber sealant offers a robust and flexible solution to caravan roof leaks. Its weather-resistant properties make it ideal for Australia’s varying climate, from scorching heat to heavy rains.
With proper application, this sealant provides long-lasting protection, keeping your caravan a comfortable and dry retreat wherever your travels take you.
Repairing a leaking caravan roof may seem daunting, but with the right approach and materials, it’s a manageable DIY task.
Liquid rubber sealant is an excellent investment to protect your caravan and ensure many more adventures on the road.

Easy Steps to Fix a Leaking Caravan Roof with Liquid Rubber Sealant
Exploring Australia's stunning landscapes in a caravan is a dream for many. However, a leaking caravan roof can quickly turn your cozy mobile home into a damp and uncomfortable space.
Don’t worry! With the right tools and techniques, you can restore your caravan to its leak-free condition. Here’s a detailed guide on how to repair a leaking caravan roof using liquid rubber sealant, an excellent solution for Australia’s diverse climate.
Locate the Leak in Your Caravan Roof
The first step in any repair is pinpointing the source of the problem. Roof leaks often occur at weak spots like joins, seams, or punctures.
Look for visible signs of water damage or perform a water test by gently spraying the roof and observing where water seeps through. This step requires some patience but is crucial for a successful repair.
Choose the Right Sealing Solution for Caravan Roof: Liquid Rubber
Once you’ve found the leak, it’s time to decide on the best sealing method:
For Small Leaks: A quick fix with silicone can temporarily seal tiny punctures or minor cracks.
For Permanent Repairs: Liquid rubber sealant is ideal for larger leaks or areas with more significant wear. This waterproof, flexible solution creates a durable membrane, protecting your caravan against Australia’s harsh weather conditions.
Apply Liquid Rubber Sealant
Follow these steps to apply liquid rubber sealant effectively:
Prepare the Surface: Clean and dry the roof thoroughly. Remove any debris, dirt, or old, flaky sealant to ensure proper adhesion.
Use a Primer: Apply a primer designed for use with liquid rubber to enhance its waterproof properties and ensure long-lasting results.
Seal and Reinforce: Carefully apply the liquid rubber sealant over the leak and surrounding area. For added durability, especially around joins and seams, use a polyester fabric or compatible tape for reinforcement.
Inspect Caravan Roof for Additional Damage
Roof leaks can cause more than a wet interior—they can lead to long-term structural issues. After sealing the leak, check your caravan for:
Mould and Mildew: Thoroughly clean any mould or mildew with an appropriate removal product. Improve ventilation to prevent future growth.
Structural Damage: Inspect for wood rot, damaged insulation, or compromised interior panels. Repair or replace these components as needed.
Test Your Repair and Maintain Your Caravan Roof
After the sealant has cured, it’s time to ensure your repair is effective:
Conduct a water test by spraying the roof and inspecting for any remaining leaks.
Regularly check your caravan roof for wear and tear to prevent future issues.
Why Liquid Rubber Sealant is Perfect for Australian Caravans?
Liquid rubber sealant offers a robust and flexible solution to caravan roof leaks. Its weather-resistant properties make it ideal for Australia’s varying climate, from scorching heat to heavy rains.
With proper application, this sealant provides long-lasting protection, keeping your caravan a comfortable and dry retreat wherever your travels take you.
Repairing a leaking caravan roof may seem daunting, but with the right approach and materials, it’s a manageable DIY task.
Liquid rubber sealant is an excellent investment to protect your caravan and ensure many more adventures on the road.
Contact Us
17 Vivian Street Blackburn North 3130 Victoria, Australia
Delivery throughout Australia
Pick Up 17 Blackburn Nth Vic 3130